Updated 7th March 2023
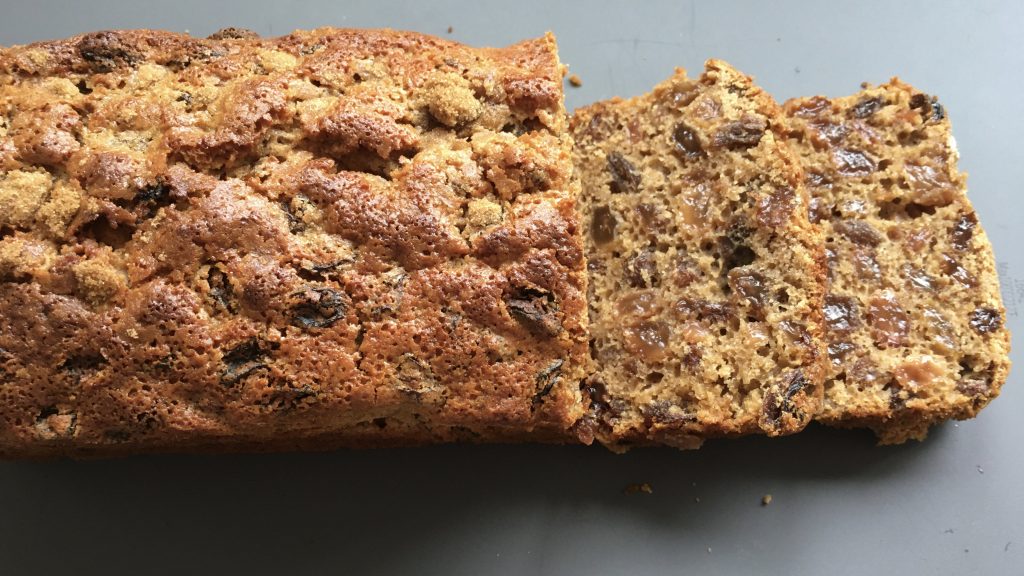
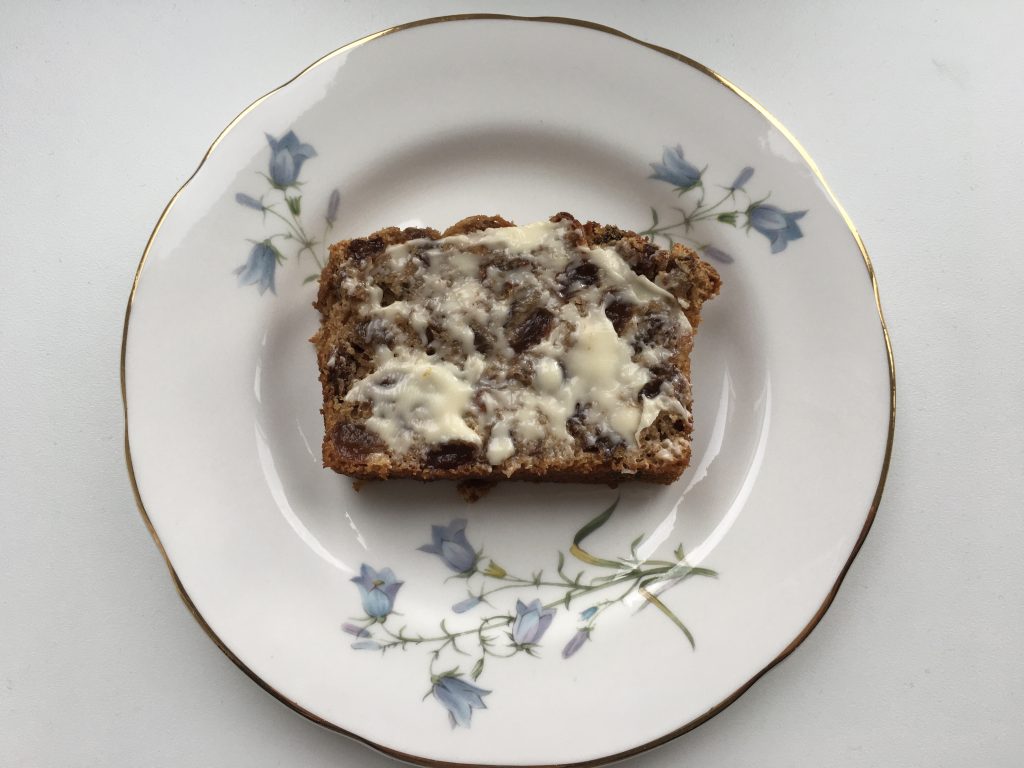
I’ve got this delightful gluten free tea loaf recipe to share with you. It’s something I used to make a lot when I worked as a cook, in a rather wonderful nursing home, many years ago. This tea loaf is nice and easy to make, and is so delicious; especially when buttered, and enjoyed with a hot cuppa!
Although the tea loaf I made for the residents at ‘High Peak’ wasn’t gluten free, to make it so, I’ve simply adapted the original recipe by replacing traditional flour for gluten free flour instead.
This tea loaf is jammed pack full of juicy sultanas, and the light sprinkle of demerara sugar over the top of the mixture before it’s baked, gives this tasty fruited tea loaf a lovely sweet crunchy topping.
If you prefer, instead of sultanas, you could use *dried mixed fruit. A few additional chopped *glacé cherries thrown into the mix works really well too! I’ve also had some lovely feedback from people that have added a spoonful of *mixed spice to the mixture, and loved the result!
Ingredients (8-10 slices)
250g (9oz) *sultanas
100g (3½oz) gluten free self-raising flour or mix
50g (2oz) light muscovado sugar
1 tablespoon golden syrup
1 large egg
180ml good strong black tea
Demerara sugar, to sprinkle over the cake before baking
Method
Put the sultanas into a large non metallic mixing bowl, add the syrup and sugar and pour in the tea (sometimes, I simply soak the fruit in tea and then add the syrup and sugar when I add the egg and gf flour; either way works). Give it a good stir and then cover the bowl and leave the fruit to soak in a cool place (not a fridge) overnight.
Once the fruit has soaked, pop the oven on and preheat to 180C/325F/Gas 4/160C Fan.
Grease and line a 1lb loaf tin.
Add the egg and gluten free flour to the soaked fruit and give everything a good mix.
Transfer the mixture into the prepared tin, sprinkle with muscovado sugar and then pop it into the oven.
Bake for approximately 40-50 minutes until the tea loaf is golden brown and feels firm when you press the top. It’s best to double check it’s thoroughly cooked by inserting a knife into the centre of the cake. If it comes out clean, then it’s fully baked.
Remove from the oven and allow to cool slightly before turning the loaf out of the tin and peeling off the greaseproof.
Allow to cool, then slice, butter and enjoy!
Recipe notes and suggestions:
If you fancy making a larger tea loaf, double the quantity and use a 2lb loaf tin. Of course this will take longer to bake.
The tea loaf is perfect for freezing. Probably best to slice and wrap individually. It will then be nice and handy to grab out a piece to defrost, as and when you fancy a slice.
The tea loaf is naturally dairy free and can be enjoyed spread with a dairy free alternative, rather than butter.
Click here to check out a quick demo of me popping one of these tasty tea loaves together.
For more cakes and bakes recipes take a peep here.
For now,
Liz x
*Check this product to ensure that there are no gluten containing ingredients, ‘may contain’ or ‘not suitable’ for a coeliac/gluten free diet warnings on the pack.
Looks great
Thanks so much! I’m delighted you think so. I’ve had some lovely feedback too from a couple of people that have made it, and been really happy with the results!😍
This looks delicious – thanks for sharing!
You’re so very welcome! It really is delicious and SO easy to make. Hope you give it a go!
Hi Elizabeth. So glad I came across your YouTube channel and website.
Question. Why do I use a Non metallic bowl?
Hi Janice, I’m delighted you found me too!! I suggest a non-metallic bowl for soaking the fruit, as the mixture may react with the metal.
I love this tea loaf and so does everyone I’ve shared it with including my two-year-old who enjoys putting together this simple recipe with me 🙂 we add a little bit of cinnamon and nutmeg and used mixed dried fruits
This is such a lovely tea loaf (although I’m not sure how anyone would have the willpower to save and freeze some of it!) Thankyou for the recipe.
Aw that’s so good to hear! I’m a huge fan of this tea loaf and I’m so glad it’s a hit with you too! Liz x
How much leavening if we don’t have self rising flour?
Hi, I’d suggest adding a level teaspoon of gluten free baking powder, and also a ¼ teaspoon on GF xanthan gum, if the flour you are using doesn’t already contain this. Hope this helps and you very much enjoy the finished tea loaf 💫
Do you pour tea over fruit when tea is still hot or do you need to cook it down before doing this, please ?
Hot tea would be great! This is a lovely cake, do hope you enjoy it 💫
Absolutely delicious 🤤 thank you for sharing your recipe.
Aw fabulous!!! I’m delighted it was a hit 💫
The loaf looks lovely but I don’t like tea; does it have a taste of tea once cooked? Could I substitute with something else?
Thank you, it really is such a lovely cake and It’s so simple to pop together. I don’t detect any tea flavour at all in the finished cake and I’ve just asked my husband, Neil and he feels the same. Should you really not want to use tea, I suggest just using the equivalent amount of boiling water to soak the fruit, and then perhaps use dark brown instead of light muscovado sugar to give your cake a nice rich colour. Hope this helps… let me know how it goes if you make it 💫
Thank you so much for your response and suggestions. I will give your recipe a try with the tea first to see, thank you. 😊
Thank you so much for your response and suggestions. I will give your recipe a try with the tea first to see, thank you. 😊
I have baked this yesterday. I added in 100gms of Glacé citrus peel as it was left over from my Christmas cake i baked for my brother. I did find with the flour I use in nz I need to up the flour quantity. I have to say it is my best one yet. Have re written out this recipie for future bakes. Thank you Liz.
Aw great stuff!! I’m delighted that you were happy with your finished gluten free tea loaf. Thanks so much for taking the time to let me know how it went… I appreciate it a lot and it will encourage others to give the recipe a go. Happy days to you in NZ 💫